Monday, January 30, 2012

Mama Lewis' Crock-Pot Beef and Broccoli


      When I was dating my husband, before we got married, his family cooked a big Chinese dinner. Ever since then, I have loved beef and broccoli. Then one year My mother-in-law gave me a recipe book for Christmas with the beef and broccoli recipe in it. Because it takes so much time, at least too much for my liking, I made it in a crock-pot. I changed a few ingredients around but to me it taste just the same.


Mama Lewis' Crock-Pot Beef and Broccoli
6oz Beef slices
3/4 cup Water
1 Beef bouillon cube
1 Tbs Soy sauce
1 Tbs Oyster Sauce
1 1/2 tsp Grape Juice (white grape juice works too)
1/2 tsp Sugar
1/8 tsp Ginger
2 tsp Garlic
Cornstarch enough to thicken sauce. (about 1 Tbs)
1 lb frozen Broccoli

Spray your crock-pot with cooking spray before you begin. In a crock-pot combine,  uncooked, cubed, Beef, water, bouillon cube, soy sauce, oyster sauce, juice, sugar, ginger and garlic. Let the meat marinate and cook for about 1-2 hours on high. Once the meat is cooked add corn starch and mix. Then add the broccoli and cook for about 1 more hours on high or 2 on low. Then you are done, but you may want to take the lid off and have it cool for about 15-20 minutes.

Friday, January 27, 2012

Temporarily Dye Your Hair- the easiest way

I have seen several techniques for temporarily dying hair. I have personally found this one to be the easiest. I used to do this in my teenage years. It is very easy and quick too.


All you need is a bottle of mousse, food coloring, bowl and a spoon.


Spray mousse into the bowl


Add food coloring...


Mix


Put it in hair. 


I pulled her hair up half way so I could do two colors.


Then all done. This is very simple and is guaranteed to be completely gone within two washes.
I hope you enjoyed this tutorial.

Note: If you or your child has blond hair and you add blue to her hair it may be green instead. Just take into consideration mixing colors

Thursday, January 26, 2012

Envelope Book for Budgeting

This year my goal is become better at budgeting. So to do this I researched a lot of systems. I decided that the system I would like to try was the Envelope system. This system seemed a little hard as using a debt card is so convenient.So what I decided was, I would pay all of my bill via the bill pay through my bank. Then from there I pull out the cash for all my other purchases.

I had to sit down and write down all of my other expenses. This is the list that I came up with
  1. Car Maintenance
  2. CoPays
  3. Date Nights
  4. Diaper/Wipes
  5. Dog Food
  6. Gas
  7. Groceries
  8. My Lunch
  9. Pest Techs - Awesome pest control business.
  10. Hygiene products-soap, shampoo, toothpaste, toilet paper
  11. Laundry/dishwasher soap
  12. Tithing
 From here I had to come up with how much I would need in these different areas to last us a month. (you can do it biweekly if you like)

Once I got that all figured out, I made an envelope for each category. My husband and I decided that at the end of the month, we should put the remaining cash from each envelope, in a rainy day fund, which is an envelope as well. This cash would be used only if had a "uneveloped" product or emergency we had to pay for. I thought this was a great idea


So here is how I have organized my envelopes. I have mine in alphabetical order.


We went on our first shopping trip and things went pretty well. When you purchase multiple items at once just review your receipt and decided how much money you spent in each area and place the remaining amount back.(This will be the main part that will help you break away from the envelope system later on)

The book is pretty easy just get some envelopes and some ribbon, cord, or yard. Punch holes in the envelopes then thread the ribbon through the holes. Make sure you don't have the ribbon too tight or it will not lay open like this

  Make sure you write on the envelopes how much money you have in each envelope. This will come in handy when you are putting the remaining amount of money in each envelope.
I hope this helps you. It has really helped us out so far. 
If you have any additional hints or ideas comment below. I would love to hear them.

Tuesday, January 24, 2012

New Method for Teaching Primary Songs in 2012


This year I decided to change my strategy a little on teaching. Our song list this year is:

As a Child of God
Choose the Right (Hymn, 239)
Stand for the Right (CS, 159)
Tell me the Stories of Jesus ( CS, 57)
When I am Baptized (CS, 103)
Nephi's Courage (CS, 120)
The Wise Man and the Foolish Man (CS, 281)
I'm trying to be like Jesus (CS, 78-79)

 I usually teach a song a month, which involves singing it multiple times over and over again, in many different fun ways, which I believe works great. But this year most of the songs are already kinda known, at least by the older kids. So I have heard about a way of teaching music where you just get them use to singing some of it or hearing it with you, then they will learn all the other words eventually. I started with the the first Sunday of the year singing at least half the songs every Sunday, using fun little tools to get them started and familiar with the song before we fully introduce it later on.


For example, with Choose the Right I had the kids jump out of there sits every time it was time to sing “Choose the Right” in the song. So I would sing it(Lol, this takes courage, but it's working) when it came time to sing “Choose the Right” I would point to the kids and they would jump out of their sits and sing the line, then sit back down and wait till the next time they could jump up. I found that the kids were listening very closely to the words waiting for their turn to jump up. Some of the kids were even able to predict that the line was coming. Now at the end of this month, I have noticed the kids are singing with or/and were trying to sing the words they didn't know with me. This activity has been so fun for the kids. They look forward to singing it every Sunday and have learned so much of it without even breaking a sweat for me

 HINT: the 3rd verse says “choose the right,” a lot, making this game a lot of fun.

 The kids already know Stand for the Right, but Sunbeams don't know it. Every time we have sung it I have had the Sunbeams come up a help me “conduct” the song. They look forward to it, but secretly it is getting them watching all the other kids sing it and keeps them focused to listen and learn the words. And its working!

 
Tell Me the Stories of Jesus, was a new one to most of the kids. This is a great one to make Signs for. We made several fun signs for this song that I will post. But the kids are learning the words as well, which is great, because it is only January! They love this song because it's a “no pressure” style of learning. Just keeping it fun, until we really have to learn it!


Nephi's Courage is another on that most kids already know. But we like to march in place to this song to "help make our voices sound strong and confident." And of course we throw our fists in the air at “I will go, I will do”. Just keeping it fun!

With I'm trying to be like Jesus, which is a song the older kids already know, I have the younger kids use there “Magic Conducting Wands”(painted Popsicle sticks) to help me keep beat while I sing. Which is at least getting the kids familiar with the song, and some can already sing the chorus.

It is really amazing the this new idea I'm trying for this year seems to already be working.  I also am hoping that it takes some stress off the months where we work on mostly "that months" song.  Remember this isn't to teach them, but just to have fun with it, get familiar with it, and love it before we spend time on it. So keep it fun!
 

My HULU Workout

 
workout


Well its a new year and everyone is looking for a new, easy, convenient ways to fit in exercising. 

When my kids nap I want to sit down and watch HULU or TV. I really don't want to spend my ME time working out. So I came up with the HULU Workout.

So here is what I do.

You pick a show on HULU, or TV then every time a commercial break begins you choose one of the following exercises and start doing it until your show comes back on.

Jumping Jacks
Crunches
Squats
Planks
Side planks
Push-ups
Jump squats
Calf raises
Lunges
Sit-ups

Its that easy. If you have time to watch TV then you have time to do this workout. No excuses!

If you are daring (or your show has tons of commercials) then you should pick an exercise to do until the commercial break then switch exercises.

NOTE: This workout will not burn as many calories as a normal workout, but is mainly a workout designed to get you into the process of working out. If you have any ideas to add to this workout comment below.


Sunday, January 22, 2012

Tanyas Singing Time

  Introduction to Tanya's Singing Time!!

I love teaching Singing Time! I’m not the best singer, but I love teaching. 
My name is Tanya and I’m going on my third year as Primary Chorister. I have taught in two different wards now. My first ward was very small with less than 20 kids. Now I teach in a ward where there are More than 50 kids! This has changed my strategies on teaching. It’s split between Senior and junior Primary, but that’s still almost 25 kids a lesson. 
My theory with my Teaching is that if kids have fun they learn, and also think its important to give everyone a turn to help, get out of their chair, and just over all, be noticed in front of the other kids. This, I’ve learned, brings the most participation and learning. So that is my focus in teaching. I’ve never blogged before, but I know how little of ideas there are out there beside Sugardoodle, which is great, but the only option that I’ve known about. So this is to share my ideas in hopes to help the other who are looking for more ideas! This is also to help me keep my ideas organized. 

I do have a CD of all the primary graphics that I use A LOT!!! I strongly suggest investing in something like this. I love visuals and I can’t draw! 

My hope is to keep up every week with my Singing time ideas. I will most likely post after Sunday so that I can provide any issues or adjustments that might help others get more success

My Sister Kristy will do most of the posting for me since right now I work full time.  Wish me Luck!

Wednesday, January 18, 2012

Photo Date Night!!! Perfect for Valentines Day!!

Who doesn't like pictures with the one they love. If you are like me, you want pictures with you and your husband but when you have kids, and your pictures consist of either you and the kids or your husband and the kids. 

Well I planned a date night with a camera. This date is not expensive and is super fun.

The rule is, you HAVE TO take 2 pictures at each date location.
Here is a walk through our date. Just so you can get a general idea of how Photo night works


Picture 1
We took a picture after we got our food at Long John Silvers - $13

Picture 2
 The I thought It would be fun to take a picture of where we went so we took a picture of us in front of the sign.

Picture 1
 We then walked to Dunkin Donuts which is through Village square so  we had to get 2 pictures here  

Picture 2

Picture 1
Then at Dunkin Donuts we took individual pictures with our dessert

Picture 2
Picture 3
 Our sign picture


On our way back to our car we noticed the store Tuesday morning and it just so happened to be Tuesday so we took a picture here.

Picture 1
Then we had snack time at Rocky Road Chocolate Factory $5

Picture 2
 They were really big strawberries,
Picture 1
 Then we sat in the massage chairs - $2


Then we sat in the photo booths and took pictures with our own camera - FREE!

Picture 2

Picture 3
This whole date was only 25 dollars. It could be cheaper, its all in where you decide to eat.  
This date was so fun and my husband got into taking the pictures, which allowed him to relax and forget about work. We took tons of picture and had a blast. I hope you enjoy this idea. There are so many other ideas that you can do, if you have any other ideas, comment below.


Thursday, January 12, 2012

How to make a Boppy


I made a Boppy for my second child and after much use, it had decided to explode. As this was my first homemade boppy, I had some design errors, but I have worked out the kinks in this new tutorial.

 You will need about 2 yards of fabric.I am using muslin. I know it is not the best looking fabric but I my next project is going to be a cover. So keep an eye out.

step 1

Lay your fabric down and fold your fabric over, like so


 Make sure it is sixteen inches long when folded, so if you open it it would be 32 complete inches.

step 2

 Cut the side of your fabric to measure 16 inches. Mine was already cut at 16.5 so I left it.


Now here is the tricky part. Lay your measuring tape down on the fabric. Mine measured 16.5, so at the bottom right corner of the fabric, hold your measuring tape at 16.5....

step 3

and then slowly move the left free end of the measuring tape upward and cut as you go. Dont worry the cut does not have to be perfect.

Now cut out your second piece just like this one. I place the cut piece over the uncut fabric and then cut  it out. Its so much easier.


Now your piece looks like this.

step 4


 The inside of the boppy is going to be about 7 inches around, so with your piece still folded in half, you are going to cut 3.5 inches in just like in step 3


 And it should look like this


 Then open your piece up like this.


 Then on ONLY ON SIDE you are going to make the rounded edge, something like the above picture.


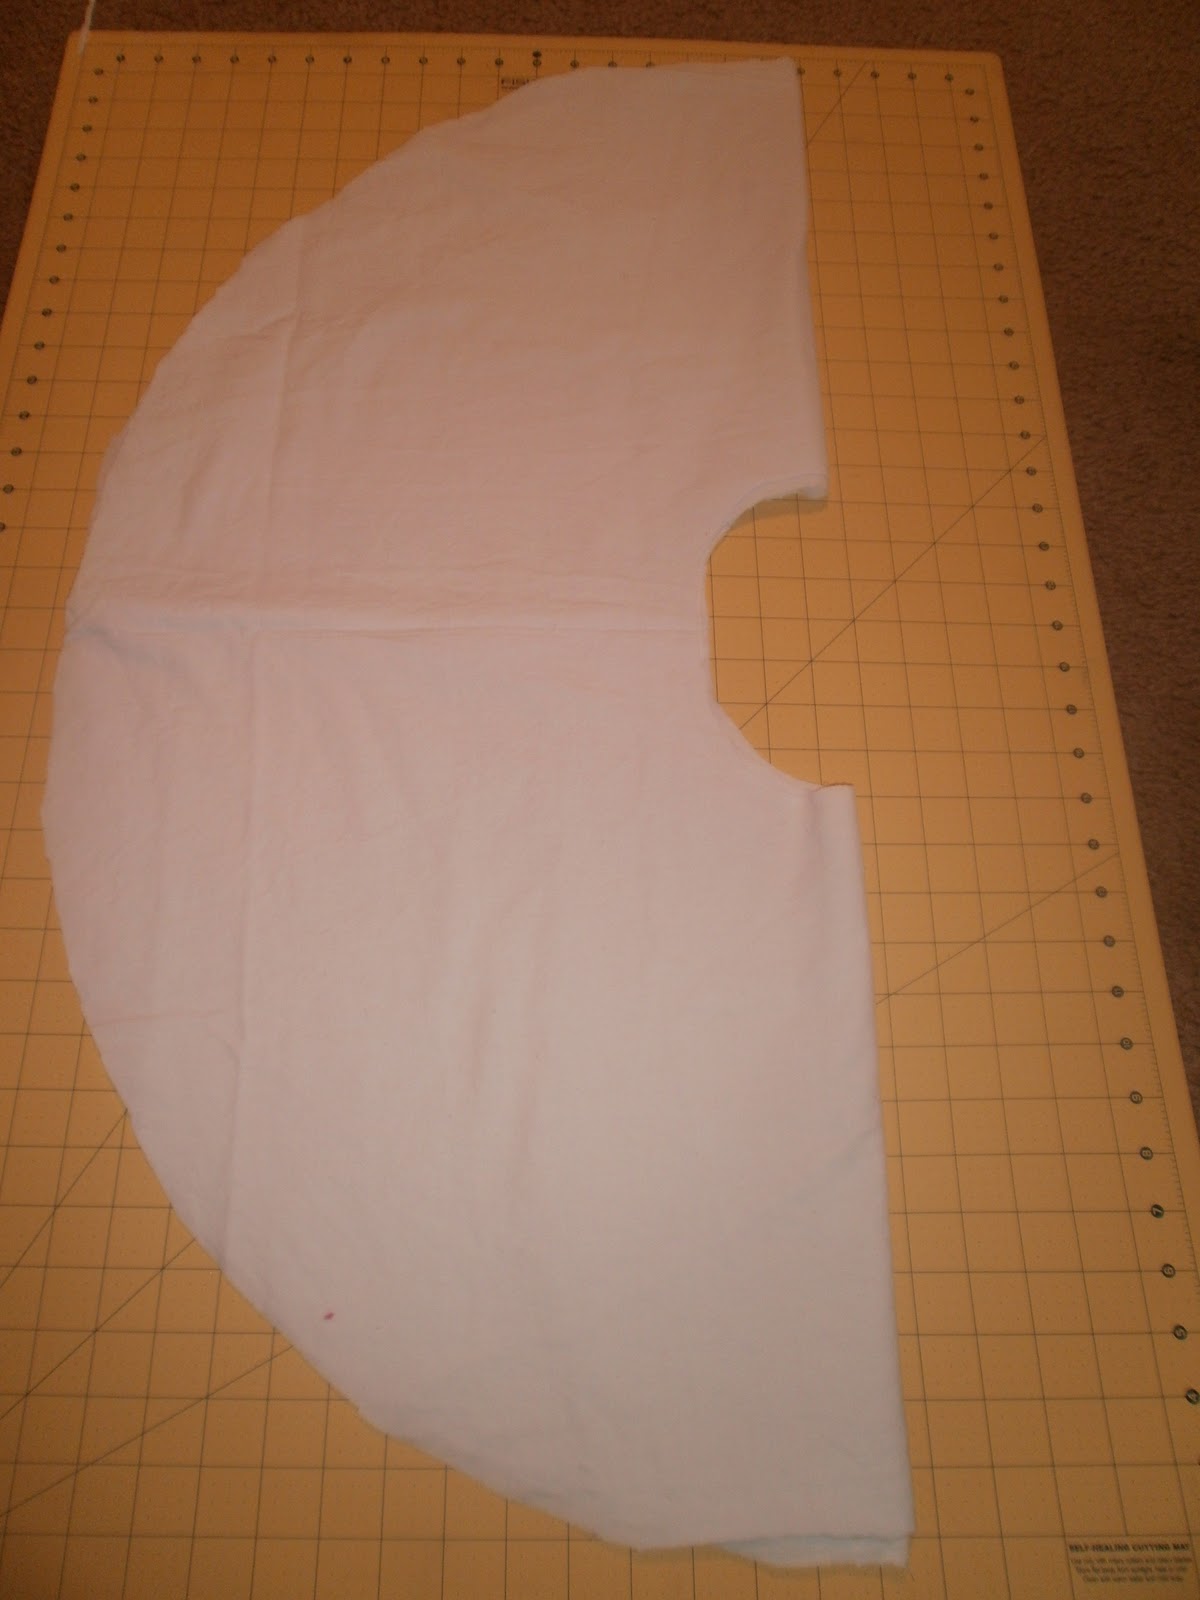
 then it will look something like this opened up all the way.


 It should measure 32 inches completely across


 13 inches wide


 and about 6 inches or so in the inside


Sew the boppy, starting with the top center and sew around leaving a opening.


 Flip your boppy right side out.


 Stuff some cotton into the opening.


 Place as much as you want to get the form and shape that you want.


 Then you are almost done.


 So from here you can do one of two things. hand stitch it or machine stitch it. Because I plan on having a cover over the top of it. I sewed it by machine.


 I pinned the side so I knew where to start and stop


 Place your whole boppy up on that desk


 Line you sewing needle up with the pins.and sew.


 I had a few issues, such as a child on my lap, that helped me make the stitch look this awesome.


Then your done. My daughter wanted to test it out and take a picture with it, so here it is.


This boppy will be completely different from other boppys cause it will be able to wrap around and  help your child sit up.


All in all, she loves it.