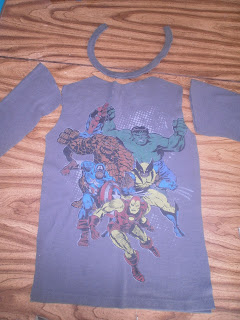
My son saw a shirt hanging in his daddy's closet and wanted it. Of course it did not fit my husband so I was given permission to make it fit my son. So here is how I did it.
I put a shirt that fit my son on top of the big shirt to determine the width of the shirt.
I cut the sides off. I made it 1/4 inch bigger for the seam allowance.
I place the sleeve over the top and measured how long the sleeves needed to be.
I placed the shirt over the picture of the shirt then cut the shape out
Fold the shirt in half so the sleeve holes would be the same size.
Remove the binding with a seam ripper, you will be using this piece later.
Cut the sleeves to the desired width, again leaving 1/4 inch seam allowance.
Here are all your pieces.
Now it is time to sew. Place the "right" sides toward each other.
Remember, Sew the pieces together on a 1/4 inch seam allowance. Zig zag stitch all seams if you don't have a Surger.
Sew the sleeves together as shown.with "Right" sides together.
Sew the body of the shirt together, as shown. Again with right sides together.
Now it is time to attach the sleeves, Keep the body of the shirt inside out and turn your sleeve right side out
Slip the sleeve inside the shirt and have the one seam in the sleeve line up with the side seam in the shirt.
Once both sleeves are attached it will look like this, You are almost done.
Now it is time so the binding around the neck. Place the binding on, starting in the middle of the back.
Pin it on in a couple of spots and over lap about 1 and a half inches, then cut off the remaining binding.
Unfold the binding, from the middle back...
and press the "right" sides together.
Sew it together I sewed on about a 1/2 seam. If you sew too much you can always take it out and try again, or if you are working with knit fabric it will strech a bit so if you are off a little just stretch the fabric.
open the seam and fold the binding back over the shirt. ( it should look like this, below)
Ta-Da!!! you have put on binding. If you have a double needle it would look more professional.
Here it is.
now to check the length.
I cut off just above Iron Mans boot.
I then surged the bottom, then folded over 1/2 inch.

Here is what it looks like finished, again a double needle would look more professional.
The shirt is still a little big but i wanted him to be able to have a little bit of grow room.
Well there it is. I hope this was helpful. Feel free to ask any questions.


No comments:
Post a Comment