Tuesday, February 7, 2012

Singing Activity Visuals

Primary Singing Time Necessities
I spent a lot of time on these, but it has really been worth the time. I got all these visuals from this CD.
This CD has tons of clip art that is great! I bought it years ago when I 1st started teaching singing time, but I believe you can still get this CD at Deseret books. I have transferred the pictures to a Window word and re-sized them there to the size I wanted, then just printed the pictures on colored paper, then laminated them! That's It!


I'm sure a lot of people are aware of this idea for singing time. When the "Go" sign is up you sing and when the "Stop" Sign is up you stop singing and just listen to the piano.

I printed this on white card stock and colored it with markers. Boys vs. Girls. All girls sing when the "Girl" sign is up and the boys sing when the "Boy" sign if up. Everyone sings if both sings are up. 


These next pictures took a little more work after I moved them to Microsoft Word then I inserted the words on them, then printed them on colored paper. I wanted to make sure I also put the real musical terms on them so the kids can get use to seeing them in the hymn book. "Mouse" sign you sing softly like a mouse(I don't like to say Quietly since some kids will not sing then. Softly, I think implies quietly without saying it). "Lion" sign you sing strong like a Lion (I try to avoid saying the word "Loud" since some kids think that means screaming. Strong means Powerful so I think loud is implied) You can alternate these while singing too.

"Sheep" sign, you sing smoothly like a sheep's wool. Tell the kids to try to avoid breathing tell you signal them to do so, to help make the song sound smooth. The "Goat" sign you sing choppy like a trotting goat. Tell the kids to make several small breaths with each syllable. I had the kids march like a goat to each syllable to help them learn this. Try this idea with Popcorn Popping! Its a big hit! If you have a great Piano player you can alternate these signs in a song too.

"Rabbit" sign, you sing faster. "Turtle" sign, you sing slower. This is a fun thing to do alternating each line of the song 

I had to draw these. I found the little people from a website and was able to draw them. The kids love this! "Standing girl" sign, you stand and "Sitting boy" sign, you sit down. Alternate these in a sound and you will keep the kids attention, for sure!


When I first introduced these I brought one set each Sunday tell we had them all understood. The kids will do one set of these Visuals for a whole singing time while learning how to sing the different ways. Great way to learn new songs!

After the kids have learned all the Visuals, I use them to help the kids know how different songs should be sung. For example, As a Child of God should be sung Strong(Lion) and Smoothly(Sheep) at the same time. Have the kids concentrate on adding both styles to the song as they sing. You'll be surprised by the result.

I will refer to these Singing Activity Visuals often in my lesson, cause I use them all the time!!  

Make Pajama Shorts and Pants Out of Adult Pajama Pants

When you have three children and are trying to save money here and there you try not to waste anything. So when my husbands new captain america pajamas shrunk in the washer, I decided my son would LOVE these. I decided to make him Pjs out of them.


 Lay the pant down and cut off the waist band


Fold the pants in half, as shown


I got a pair of my sons pants for a measurement of how big they needed to be. Place the pants you wish to mimic over the top of the big pants


Cut about a inch away from the little pants, as you will need seam allowance. Make sure you cut about 2 inches at the top, cause you will be folding it down for the waist band. Also, I wanted these pants to be a little longer so I added an inch to the bottom and, to save time, I am using the original hem.:)


When I told my daughter I was making her brother pjs, she wanted some too, so I had enough to make her shorts. She was thrilled.


So here are what the pieces will look like when your done.  The piece on the left is two legs for shorts and the piece on the right is two legs for pants.


Starting with the shorts, open up the pieces and fold it up about an inch and sew. I surged mine, you can zig zag stitch yours but neither is really necessary as the fabric will not fray.


Here is a close up of what it will look like

 
Now that both pants are already hems and ready to go, you can start by sewing the inside leg seam.(like the above picture) Do that on both of the legs.


Now your going to flip one pant leg right side out.


Then stuff the right side out leg into the other leg, as shown above.


Now sew along the inseam (the black line)


If you look closely you can see my stich


Now fold down the top of the pants about 1.5 inches.


Stitch around, just like you would if you were hemming the pants, BUT leave about a inch open, as shown.


Get a piece of elastic that fits the waist of your child nice a comfortably, Get one end and place a safety pin on it, like shown.


Stuff the safty pin up through the area you left open.


Push it all the way through, and stitch the front and back of the elastic together, as shown.
 

Then you are all done


and your kids can enjoy them. 


My kids did. They thought it was so cool that their pants matched.

Sunday, February 5, 2012

Bean Bag Toss Singing Time

Bean Bag Toss Singing Time
This Sunday was the end of practicing As a Child Of God. So as a fun sign off activity we played Bean Bag toss. We have this game with all our yard games and thought it would be fun for Singing Time and it WAS! Each Hole in the base is worth either 1, 2, or 3 points.
I put the kids into two teams. The Red Team and Blue Team since that was the colors of the Bean Bags. I had four kids from the 1st team throw their Bean Bags into the nets to see how many points are possible for that round. Then I had just that team sing the first verse of the song to see if they “earn” all their points. If they didn’t sing well they might only get half the points (this never had to happened, but I made sure they knew it could happen). Then the next team throws their four Bean bags to see how many points they can sing for. They sang the same one verse. We did this for all three verses, and then moved to some other songs we have been practicing. The kids were aware that they would lose points if they were not reverent, and that really helped keep them calm, through this very exciting game. They had so much fun and I could tell they really knew the Songs! This was a great game since it gave everyone a turn to play, plus we sang just practice songs and everyone still had fun!

Friday, February 3, 2012

Peanut Butter Cake Cookies

The other night while my husband was gone, I wanted to surprise him with cookies. I didn't have too much time though. I remembered that people have used cake mix to make cookies... so... I couldn't find any recipe I liked so I decided to attempt my own recipe. I decided I wanted them to taste Reeses like. So here is what I came up with.

Peanut Butter Cake Cookies
1 cake mix (chocolate fudge)
1 1/2 c Peanut Butter
3/4 c Powdered Sugar
1/4 c Flour
1-2 c Chocolate Chips

Preheat your oven to 350 degrees
Get you cake mix and prepare it as if you were going to make a normal cake. I used the high altitude instructions.


Add peanut butter, powdered sugar, flour, and chocolate chips

Mix them all together, the dough will be really gooey.


 I used a tablespoon scoop and placed the cookies about 2 inches apart, as the dough will spread.
HINT: If you spray yours scoop with cooking spray the dough will come right out.
 Cook them for 8 minutes


Let them cool ....


and your done.  Eat them up.


I saw my sister-in-law store her cookies in a ice cream container and thought it was a genius idea.


Also another little trick, If you don't want your cookies to get hard add a piece of bread to your cookie jar and your cookies will stay soft longer. 
NOTE: You do NOT need to add a piece of bread while storing these cookies, as these cookies are super moist already. 
I hope you enjoyed them.

Thursday, February 2, 2012

As a Child of God


Here Is my hand signs for As a Child of God performed by my daughter Emily! She is my little CTR!
I broke the song down so you can see each part of the song and what sign goes to each. I bolded the exact word that each sign represents.


 I Came(point to self)


 To Earth(point down to the ground)


 With power to Choose(show your "power" muscles:)


 Good Choices bless (Make a "Blow kiss" sign which is "good" in sign language)


Me and


My Family too. (Put your hands to your chest then spread then out and then together like a book to represent you then all the other people around, like a family)


 As a Child of God (you "pat" the head of imaginary kids sitting in a circle around you, like when the children gathered around Jesus's knee)


 I recieved Special Light (make a flickering hand sign to represent a flashing light)


 The Holy Ghost helps me


To know what is right

Wednesday, February 1, 2012

Singing time Scavenger Hunt


Scavenger Hunt

I love doing this type of lesson cause everyone can have a turn and they really look forward to it; so they are very good singers cause they are excited for their turn. 

Preparations needed for this lesson is:
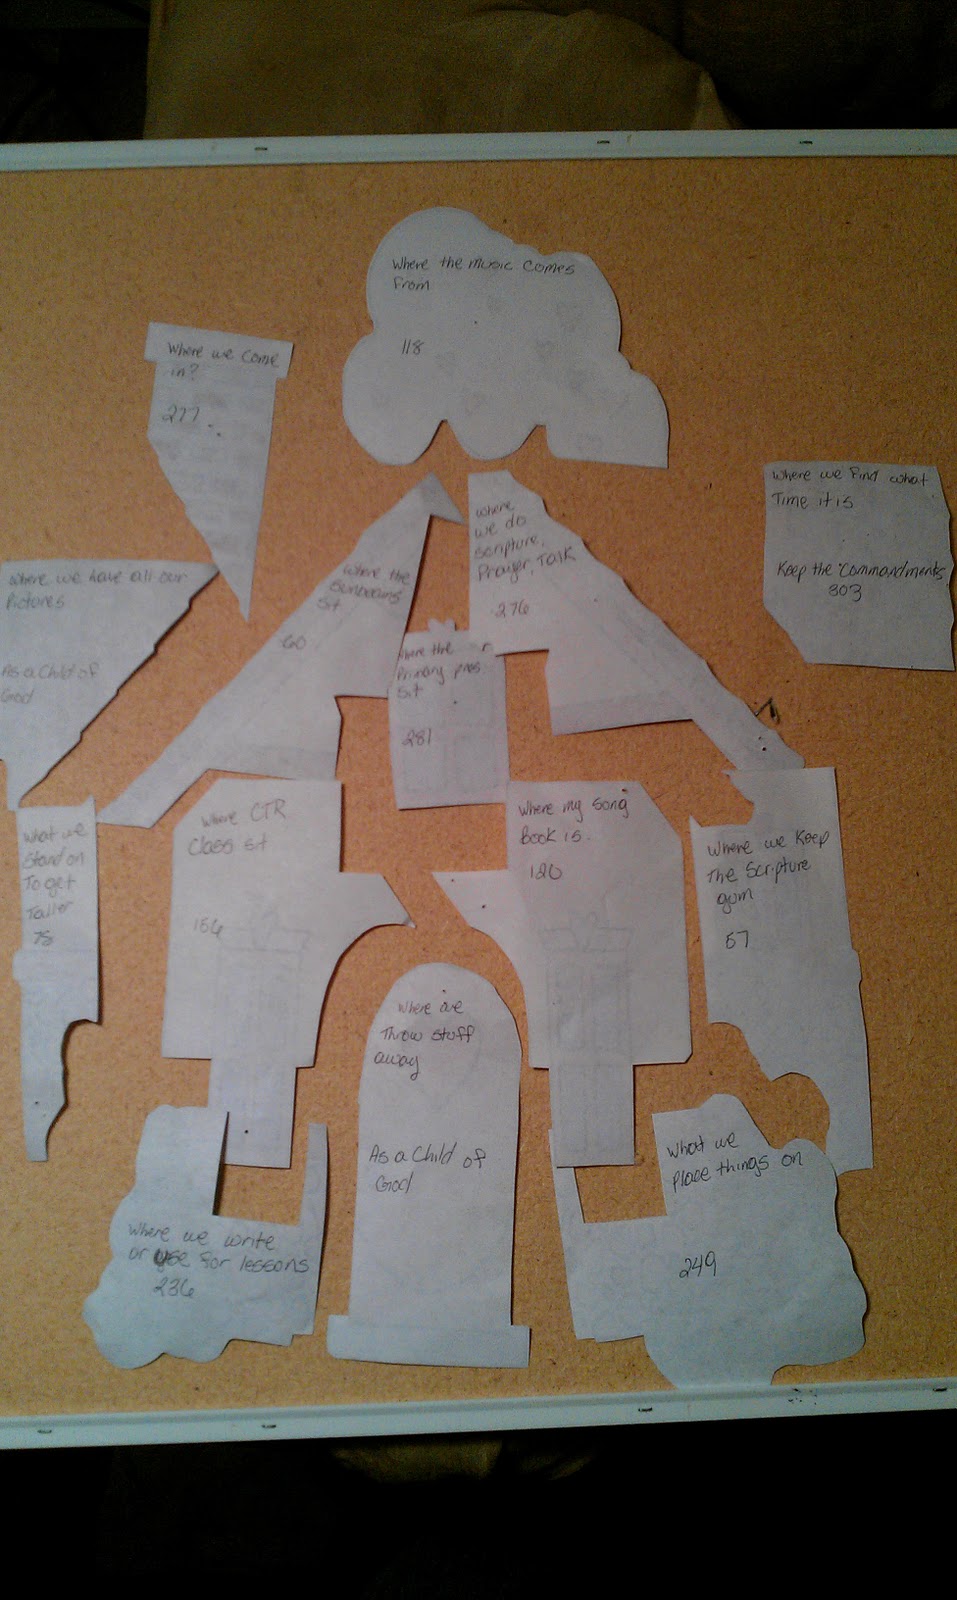
  • A picture that can be transformed into a puzzle. I got my Picture Puzzle from my singing time CD called Primary Partners Singing Fun! My Family Can Be Forever
  • Come up with a lot of fun hiding places in your Primary room to hide each piece.
  • Pick some songs. Enough for each puzzle piece.
  • You will also need some advance time in the primary room to hide all the pieces before the kids get there.
  • Prepare a Cheat Sheet with all the clues listed in a row.
You can get any picture and cut it into as many pieces as you need to fill your time. I had 30 minutes this Sunday so I cut it into 17 pieces.


I flipped them all over and put clues and a song on the back of each piece. 
For example, one piece would say "Tick Tock" so they know the 1st clue is hidden on the clock and also written on it is "Nephi's Courage" so they know what to sing after. They then start building the house top to bottom on the board as the clues are found. You can hide them everywhere: under tables, on the piano, and even on people!  Don't forget to make you a sheet with all the clues in what order and where there hidden just in case.
 Since I have alot of kids I put them in groups of 3. They all look for the clue. Whoever finds it(kid 1) gives it to kids 2 who waits tell after the song is sung then reads the the next clue. While the next group of kids are looking for the next clue, kid 3 puts the pieces on the board to build the house.

If you spend some time on this lesson it will be your kids favorite. Just do a different picture every time. Make the clues fun. If your really creative you can make them rhythm. I'm not that good,but it would be fun.

Sample clues:
"Testing, Testing 1 2 3" -Microphone
"I looked out the ____ and what did I see" - Window
"Jesus wants me for a Sunbeam" -Under one of the Sunbeam's chairs
"The Chapel ___ seem to say to me" - Door
"Choose the Right"- Under the CTR Class chair
"You've had a birthday Shout Hurray"- Birthday board
(Draw some notes on the back) - the piano
You can also make it a very long puzzle/Scavenger hunt so that maybe it could take two whole Sundays!

Monday, January 30, 2012

Mama Lewis' Crock-Pot Beef and Broccoli


      When I was dating my husband, before we got married, his family cooked a big Chinese dinner. Ever since then, I have loved beef and broccoli. Then one year My mother-in-law gave me a recipe book for Christmas with the beef and broccoli recipe in it. Because it takes so much time, at least too much for my liking, I made it in a crock-pot. I changed a few ingredients around but to me it taste just the same.


Mama Lewis' Crock-Pot Beef and Broccoli
6oz Beef slices
3/4 cup Water
1 Beef bouillon cube
1 Tbs Soy sauce
1 Tbs Oyster Sauce
1 1/2 tsp Grape Juice (white grape juice works too)
1/2 tsp Sugar
1/8 tsp Ginger
2 tsp Garlic
Cornstarch enough to thicken sauce. (about 1 Tbs)
1 lb frozen Broccoli

Spray your crock-pot with cooking spray before you begin. In a crock-pot combine,  uncooked, cubed, Beef, water, bouillon cube, soy sauce, oyster sauce, juice, sugar, ginger and garlic. Let the meat marinate and cook for about 1-2 hours on high. Once the meat is cooked add corn starch and mix. Then add the broccoli and cook for about 1 more hours on high or 2 on low. Then you are done, but you may want to take the lid off and have it cool for about 15-20 minutes.

Friday, January 27, 2012

Temporarily Dye Your Hair- the easiest way

I have seen several techniques for temporarily dying hair. I have personally found this one to be the easiest. I used to do this in my teenage years. It is very easy and quick too.


All you need is a bottle of mousse, food coloring, bowl and a spoon.


Spray mousse into the bowl


Add food coloring...


Mix


Put it in hair. 


I pulled her hair up half way so I could do two colors.


Then all done. This is very simple and is guaranteed to be completely gone within two washes.
I hope you enjoyed this tutorial.

Note: If you or your child has blond hair and you add blue to her hair it may be green instead. Just take into consideration mixing colors